WordPress Roots Stack
Table of Contents
- Overview
- Adding Composer Plugins
- Google Analytics
- React Integration
- SVG in React
- Bedrock Multisite
- SMTP via Postmark
- Updating Trellis
- Server Monitoring
- See Also
Overview
The Roots stack is Lemone's preferred WordPress development framework, consisting of three tools:
Bedrock
Modern WordPress stack with improved folder structure, dependency management, and environment-based configuration.
Key features:
- WordPress as a Composer dependency
- Better folder structure (web/wp/ for WordPress core)
- Environment-based configuration (.env files)
- Dependency management via Composer
- Enhanced security (WordPress not in web root)
Resources: roots.io/bedrock
Sage
Modern WordPress starter theme with front-end tooling powered by Bud.
Key features: - Modern JavaScript (ES6+) - Blade templating engine - Tailwind CSS (or Sass) - Hot module reloading - Laravel Mix / Bud build system
Resources: roots.io/sage
Trellis
Ansible-based WordPress LEMP stack for deployment and server management.
Key features: - Automated provisioning - Zero-downtime deployments - SSL certificates (Let's Encrypt) - Multiple environments (development, staging, production) - Security hardening
Resources: roots.io/trellis
Adding Composer Plugins
Installing WordPress Plugins via Composer
Step 1: Find the plugin on WPackagist
Visit wpackagist.org and search for your plugin.
Step 2: Navigate to site folder
Step 3: Install plugin
Example:
# Install Yoast SEO
lando composer require wpackagist-plugin/wordpress-seo

# Install Contact Form 7
lando composer require wpackagist-plugin/contact-form-7
Step 4: Commit changes
Tip
Always commit both composer.json and composer.lock to ensure consistent plugin versions across environments.
Google Analytics
Adding Google Analytics (Universal Analytics)
Warning
Note: Universal Analytics (UA) is deprecated. Consider using Google Analytics 4 (GA4) instead. This guide covers the legacy UA method using Soil.
Step 1: Create GA Property
Create and copy your GA tracking code from Google Analytics.
Step 2: Add Soil Support
Edit site/web/app/themes/your-theme/app/setup.php:
Replace UA-XXXXX-Y with your actual tracking ID.
Step 3: Commit changes
git add site/web/app/themes/your-theme/app/setup.php
git commit -m "feat(analytics): add Google Analytics tracking"
React Integration
Setting Up React in Sage
Use React components within your WordPress theme.
Step 1: Install React packages
Edit package.json and add:
{
  "devDependencies": {
    "@roots/bud": "6.12.3",
    "@roots/bud-sass": "6.12.3",
    "@roots/bud-tailwindcss": "6.12.3",
    "@roots/bud-react": "6.12.3",
    "@roots/sage": "6.12.3"
  },
  "dependencies": {
    "react": "18.2.0",
    "react-dom": "18.2.0"
  }
}
Warning
Version matching is critical: Ensure @roots/bud-react version matches @roots/bud and @roots/sage. Also ensure react and react-dom versions match.
Step 2: Install dependencies
Step 3: Create render target
In your Blade template (e.g., app.blade.php), add a div with an ID:
Step 4: Create React component
Create resources/scripts/components/helpbot/helpbot.jsx:
import { useState } from 'react';

const HelpBot = () => {
  const [count, setCount] = useState(0);

  const handleClick = () => {
    setCount((count) => count + 1);
  };

  return (
    <>
      <button onClick={handleClick}>
        Clicked: {count}
      </button>
    </>
  );
};

export default HelpBot;
Step 5: Multiple component files (optional)
Create resources/scripts/components/helpbot/title.jsx:
Import in helpbot.jsx:
import { useState } from 'react';
import Title from "./title";

const HelpBot = () => {
  return (
    <>
      <Title title="This is a title" />
      <button>Click me</button>
    </>
  );
};

export default HelpBot;
Step 6: Render component
In your main JavaScript file (app.js), render the component:
import { createRoot } from 'react-dom/client';
import HelpBot from './components/helpbot/helpbot';

const container = document.getElementById('helpbot');
if (container) {
  const root = createRoot(container);
  root.render(<HelpBot />);
}
Resources: - Roots Discourse: Sage 10 with React 18
SVG in React
Using SVGs as React Components
For projects using React (Radicle or Sage with React), you can import SVGs directly as components.
Warning
This guide assumes icons are stored in resources/images/icons. Adjust paths if your structure differs.
Step 1: Install @svgr/webpack
Step 2: Configure bud.config.ts
Add to the end of the config function:
export default async (bud: BUD) => {
  // ... existing config

  bud.hooks.on(`build.module.rules.oneOf`, (rules = []) => {
    rules.unshift({
      test: /\.svg$/,
      use: [`@svgr/webpack`],
    });

    return rules;
  });

  bud.alias(`@icons`, bud.path(`resources/images/icons`));
}
Step 3: Update tsconfig.json
Add icon path alias in compilerOptions.paths:
Step 4: Use SVGs in components
Import SVG as a component:
Use in JSX:
Tip
Ensure your SVG files only have a viewBox attribute (no width or height). This allows you to control size via CSS.
Bedrock Multisite
Setting Up WordPress Multisite with Bedrock
Bedrock requires a URL fix for multisite network admin paths to work correctly.
Step 1: Install URL fixer
Or manually add must-use plugin:
Create site/web/app/mu-plugins/ms-url-fixer.php:
<?php
/**
 * Plugin Name: Multisite URL Fixer
 * Plugin URI: https://github.com/roots/bedrock/
 * Description: Fixes WordPress issues with home and site URL on multisite.
 * Version: 1.0.0
 * Author: Roots
 * License: MIT License
 */

namespace Roots\Bedrock;

if (!is_multisite()) {
    return;
}

class URLFixer {
    private static $instance = null;

    public static function instance() {
        if (null === self::$instance) {
            self::$instance = new self();
        }
        return self::$instance;
    }

    public function add_filters() {
        add_filter('option_home', array($this, 'fix_home_url'));
        add_filter('option_siteurl', array($this, 'fix_site_url'));
        add_filter('network_site_url', array($this, 'fix_network_site_url'), 10, 3);
    }

    public function fix_home_url($value) {
        if ('/wp' === substr($value, -3)) {
            $value = substr($value, 0, -3);
        }
        return $value;
    }

    public function fix_site_url($value) {
        if ('/wp' !== substr($value, -3)) {
            $value .= '/wp';
        }
        return $value;
    }

    public function fix_network_site_url($url, $path, $scheme) {
        $path = ltrim($path, '/');
        $url = substr($url, 0, strlen($url) - strlen($path));

        if ('wp/' !== substr($url, -3)) {
            $url .= 'wp/';
        }

        return $url . $path;
    }
}

URLFixer::instance()->add_filters();
Deploying Multisite to Server
Step 1: Disable multisite ENV vars
In application.php, comment out multisite configuration:
/**
 * Multi site
 */
#Config::define('WP_ALLOW_MULTISITE', true);
#Config::define('MULTISITE', true);
#Config::define('SUBDOMAIN_INSTALL', false);
#Config::define('DOMAIN_CURRENT_SITE', env('DOMAIN_CURRENT_SITE'));
#Config::define('PATH_CURRENT_SITE', env('PATH_CURRENT_SITE') ?: '/');
#Config::define('SITE_ID_CURRENT_SITE', env('SITE_ID_CURRENT_SITE') ?: 1);
#Config::define('BLOG_ID_CURRENT_SITE', env('BLOG_ID_CURRENT_SITE') ?: 1);
Step 2: Deploy and install WordPress
Install WordPress normally via browser.
Step 3: Enable WP_ALLOW_MULTISITE
Uncomment only this line:
Step 4: Enable network in WordPress admin
- Log in to WordPress admin
- Go to Tools → Network Setup
- Choose subdomains or subdirectories
- Click Install
Step 5: Enable remaining multisite settings
Uncomment all multisite ENV vars in application.php.
SMTP via Postmark
Configuring Transactional Email with Postmark
Step 1: Create sender in Postmark
- Log in to Postmark
- Go to Sender Signatures → Domain → Enter domain name
- Go to Servers → Create → Enter client name
Step 2: Configure DNS
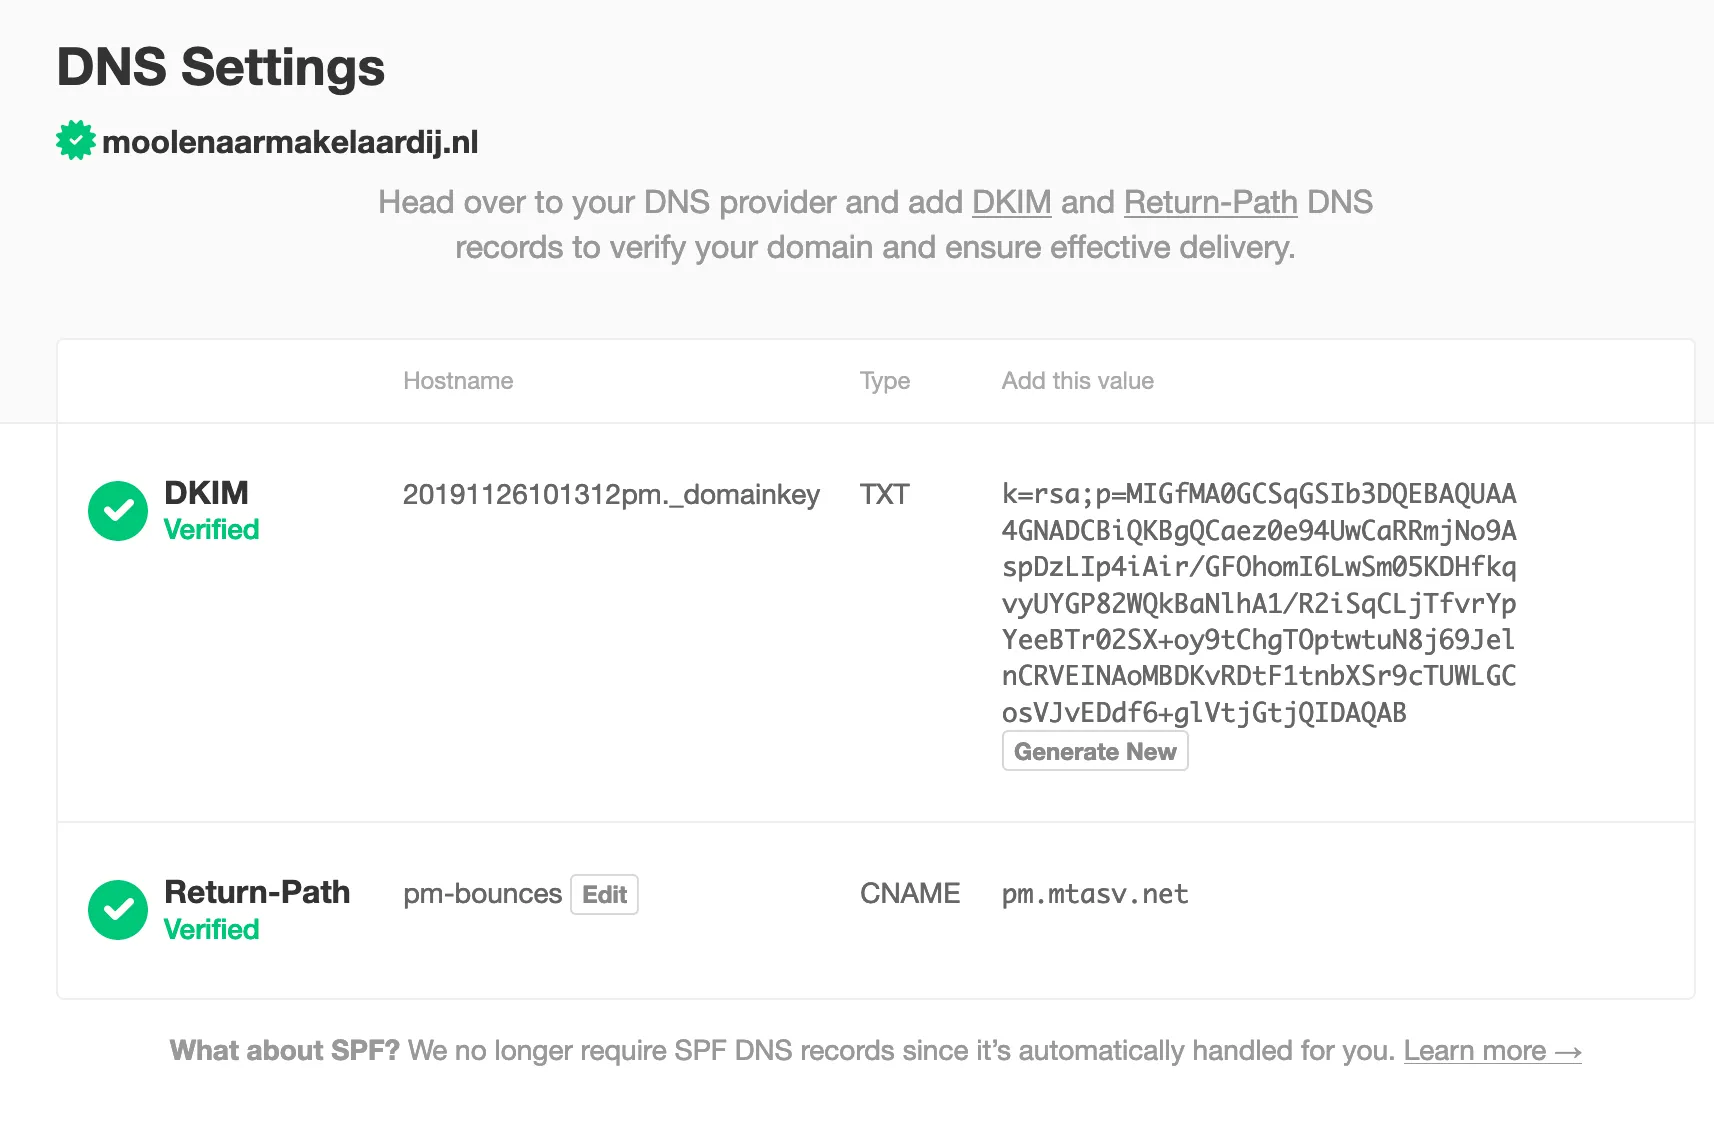
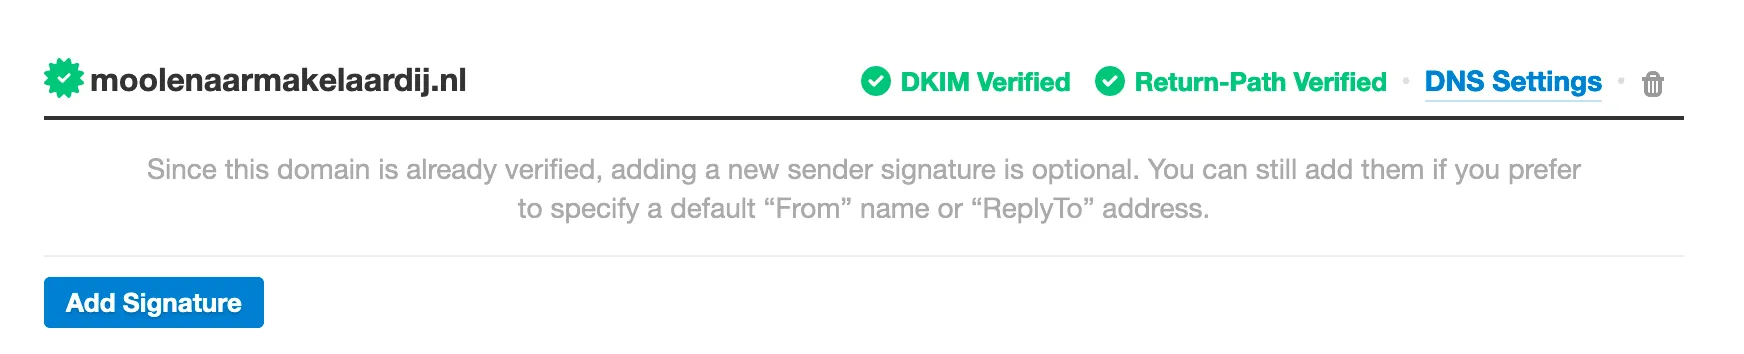
Add two DNS records (provided by Postmark): 1. DKIM record (DomainKey) 2. Return-Path record
Check the Sender Signatures tab in Postmark for the exact records to add.
Example DNS records:
Step 3: Install Postmark plugin
Step 4: Configure plugin
- Activate plugin in WordPress admin
- Go to Settings → Postmark
- Enter your Postmark API key (Server API Token)
- Configure sender email and name
Note
Don't forget to install the Postmark plugin before deploying.
Updating Trellis
Upgrading Trellis to Newer Versions
Step 1: Create upgrade branch
Step 2: Clone latest Trellis
Step 3: Remove .git folder
Step 4: Copy files to your Trellis folder
Step 5: Remove upgrade folder
Step 6: Review changes and test
Review all changes carefully, especially if you have custom configurations.
Step 7: Commit upgrade
Server Monitoring
Setup Prometheus Monitoring with Trellis
Step 1: Add to requirements.yml
Edit trellis/requirements.yml (or galaxy.yml):
Step 2: Add to server.yml
Edit trellis/server.yml:
Step 3: Update security.yml
Edit trellis/group_vars/all/security.yml and add to ferm_input_list:
ferm_input_list:
  - type: dport_accept
    dport: [http, https]
    filename: nginx_accept
  - type: dport_accept
    dport: [ssh]
    saddr: '{{ ip_whitelist }}'
  - type: dport_limit
    dport: [ssh]
    seconds: 300
    hits: 20
  # Add this block:
  - type: dport_accept
    dport: [9100]
    saddr: [128.199.44.89]  # Your monitoring server IP
    accept_any: false
Step 4: Install requirements
Step 5: Provision server
Troubleshooting
Error: objc[95218]: +[__NSPlaceholderDate initialize] may have been in progress
Fix (macOS only):
Then run your playbook again.
Error: Make sure the required command to extract the file is installed
Install GNU tar:
Resources: - How To Install Prometheus on Ubuntu 16.04
See Also
- WordPress Development - General WordPress guide and project setup
- Lando - Local development environment
- Trellis Deployment - Trellis deployment guide
- Roots Sync Scripts - Database synchronization between environments
- Exonet Hosting - Deployment to Exonet servers
- Kinsta Hosting - Kinsta-specific procedures